I
Ceramic Effect sono i nuovissimi smalti della
Layla Cosmetics...
Come caratteristica principale hanno un'alta pigmentazione ed una consistenza che si autolivella sulle unghie...
Incuriosita da queste proprietà qualche settimana fa ne ho comprato qualcuno e poi mi sono ripromessa di provarli...
Ora ne sono innamorata...ma sapete che all'inizio li avevo giudicati male?
La Layla consiglia di applicare questi smalti anche senza base, io per principio metto la base anche sotto lo smalto bianco!!!
Questo perche' ritengo che l'unghia risulti più liscia, l'applicazione dello smalto risulti più agevole e la stessa rimozione sia più veloce...
E quindi come ogni manicure, avevo messo la mia
base SOS Repair & Care di Essence.
Solo che andando a stendere lo smalto, questo non scorreva assolutamente, lasciava striature, al che mi sono detta "ma non doveva essere autolivellante?"...Mah...
Li ho lasciati lì con l'idea di riprovarli...
L'ho fatto tra ieri e oggi, ma questa volta ho cambiato base e messo sotto lo
SPECIAL BASE al pantenolo sempre della Layla...Bene, il risultato mi ha sorpreso, lo smalto si stendeva che era una meraviglia e finalmente ne ho potuto apprezzare le caratteristiche autolivellanti!
Tutto questo per dirvi come una cosa "insignificante " come una base possa "compromettere" il risultato della nostra manicure...
Ok dopo tante chiacchere ecco finalmente gli swatch dell'intera collezione che conta la bellezza di
10 colori.
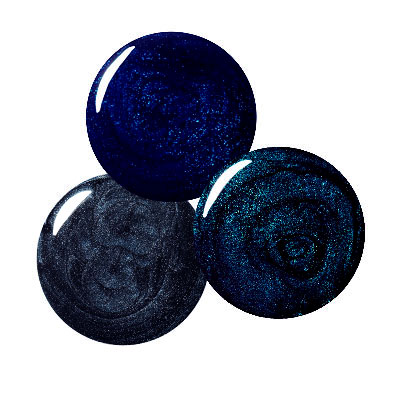
 Layla Cosmetics
Ceramic EffectBianco n° ce01Quelle che vedete sono 1 passata di
Special base della Layla, 2 passate di smalto e 1 di
top coat Brillant due sempre della Layla.
La foto e' scattata con luce artificiale diffusa.
Un delicatissimo bianco latte molto luminoso, come vedete con 2 passate non e' del tutto coprente.
 Layla CosmeticsCeramic EffectBeige/panna n° ce02
Quelle che vedete sono 1 passata di Special base della Layla, 2 passate di smalto e 1 di top coat Brillant due sempre della Layla.
La foto e' scattata con luce artificiale diffusa.
Nella confezione sembra beige e invece una volta steso e' un panna lievemente rosato...
Sarà che a me questo colore ricorda inevitabilmente vestiti da sposa e matrimoni per la sua delicatezza ;-)
 Layla CosmeticsCeramic EffectRosa n° ce03
Quelle che vedete sono 1 passata di Special base della Layla, 2 passate di smalto e 1 di top coat Brillant due sempre della Layla.
La foto e' scattata con luce artificiale diffusa.
Un rosa molto zuccheroso ;-) con due passate non e' del tutto coprente.
Mi piace molto come punto di rosa dona una dolce luce alle unghie!
 Layla CosmeticsCeramic EffectLilla n° ce04
Quelle che vedete sono 1 passata di Special base della Layla, 2 passate di smalto e 1 di top coat Brillant due sempre della Layla.
La foto e' scattata con luce artificiale diffusa.
Lilla, lilla al quadrato! Stupendo lilla!
Bellissimo, anche questo non del tutto coprente con due passate e lievemente riflessato.
Da questo punto in poi dimenticate i colori chiari iniziamo le danze con i rossi e gli scuri! Wow! Layla CosmeticsCeramic EffectBourdeux n° ce05
Quelle che vedete sono 1 passata di Special base della Layla, 2 passate di smalto e 1 di top coat Brillant due sempre della Layla.
La foto e' scattata con luce artificiale diffusa.
Bello non e' vero?
Siccome ho il sospetto di non aver reso giustizia con questa foto a questo smalto eccovene un'altra che lo mostra un pochino più in ombra.

 Layla CosmeticsCeramic EffectRosso n° ce06
Quelle che vedete sono 1 passata di Special base della Layla, 2 passate di smalto e 1 di top coat Brillant due sempre della Layla.
La foto e' scattata con luce artificiale diffusa.
Forse il più fluido e brillante di tutti, ce l'ho ancora su' mentre vi scrivo e non faccio altro che guardarmi le unghie ogni volta che passo vicino ad una luce più forte...brilla, brilla, brilla!
 Layla CosmeticsCeramic EffectRosso Scuro n° ce07
Quelle che vedete sono 1 passata di Special base della Layla, 2 passate di smalto e 1 di top coat Brillant due sempre della Layla.
La foto e' scattata con luce artificiale diffusa.
Altro rosso bellissimo, ma quanto ho penato per fotografarlo nemmeno vi immaginate.
Nello studio fotografico appariva così, poi appena uscivo sotto il neon diventata più scuro...
Alla fine siccome e' un colore "mutevole" vi riporto altre foto per documentarvi i cambi in base alla luce.
Un po' più in ombra:

Con luce al neon, vedete come e' più scuro?:

 Layla CosmeticsCeramic EffectViola/Nero n° ce08
Quelle che vedete sono 1 passata di Special base della Layla, 2 passate di smalto e 1 di top coat Brillant due sempre della Layla.
La foto e' scattata con luce artificiale diffusa.
Ed ecco il colore
ultravampy della collezione,un compattissimo viola nero stupendo!!
Con il top coat poi si lucida a non finire...
Ecco un'altra foto per voi...

 Layla CosmeticsCeramic EffectFucsia n° ce09
Quelle che vedete sono 1 passata di Special base della Layla, 2 passate di smalto e 1 di top coat Brillant due sempre della Layla.
La foto e' scattata con luce artificiale diffusa.
Mai colpita così tanto da un fucsia...sarà la primavera, sarà che avevo voglia di colore... mi e' dispiaciuto da morire quando l'ho dovuto togliere per fare gli altri swatch...e allora da vera prima donna ecco altre foto del bel fucsia...

Guardate che colore pieno!

 Layla CosmeticsCeramic EffectVerde Foresta n° ce10
Quelle che vedete sono 1 passata di Special base della Layla, 2 passate di smalto e 1 di top coat Brillant due sempre della Layla.
La foto e' scattata con luce artificiale diffusa.
Questo colore ha già mietuto le sue "vittime" sulla nostra
pagina Fan su Facebook...Un verde scuro bellissimo e portabilissimo proprio perche' non troppo chiaro, lievemente riflessato.

-----
Bene e anche oggi super reportage!
Ringrazio la
preparatissima Babila della Layla Cosmetics per avermi inviato i colori che mancavano per completare gli swatch della collezione!
Vi ricordo che
gli smalti della Layla costano sui 4,50 euro l'uno (poi dipende sempre da negozio a negozio) e che qui potete trovare la lista dei punti vendita in tutta Italia:
Punti vendita Layla Cosmetics in ItaliaIn più
se volete spendere ancora di meno esistono alcuni colori che sono stati rieditati nei formati mini che si chiamano
BIJOU e che costano sui 2,90 euro (4,5ml) li potete vedere qui:
Layla Cosmetics collezione completa smalti
La volete sapere quale e' la cosa più bella che ho ricevuto tra i tester?
La cartella colori completa in cartone con tuuuuutti i colori degli smalti...un colpo d'occhio indescrivibile, quasi quasi ci faccio un poster... ;-)