I haven't posted in a while and I thought I'd update my blog on what I've been doing recently. I'm planning to do more tutorials with the haul of China Glaze and Essie polishes that I got previously however, 24 hours isn't enough so these will come slowly. :( So here's an update on my purchase, nail sets/design & tutorial!
recent polish purchase:
- American Apparel Cotton
- American Apparel Hunter
- American Apparel Passport Blue
AND:
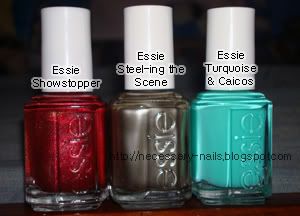
* Side story: I haven't shopped at the nail supply store that I've gone to in months & I came across the small place in middle school. So I entered the store and the workers greeted me with a hello. As I looked around - I couldn't decide what polishes to get. I went around and around for about 3-4 times between Dante, OPI and Essie and I hear the door opening and a few girls coming in. I went to look at the Dante polishes where they were and the male worker asked them if they were nail technicians or professionals & that they only sell to them. So I thought in my head, sh*t that means I can't buy anything :(. The girls immediately left after that since they looked obviously a student probably in middle school - since I used to go to middle school around there. After I continued to look around and gathered my courage in hopes of being able to buy the 3 polishes I selected. And to my happiness and hopes, I was able to! Thank goodness because I am no nail technician, student or professional.
-♥-
recent nail sets:
(1) Last week's nails
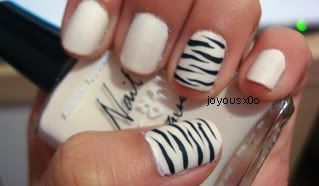
Base: American Apparel Cotton with black nail art to make zebra stripes and topped with Essie Matte About You. - I don't own any whites in my nail polish collection so I decided to get Cotton. It's a very nice white that doesn't make my fingers and hands look weird. The formula is thin since it is from American Apparel. The application was good - not bad. I believe I used 2-3 coats of Cotton to make sure the color was even. I used Essie's MAY to top it off and I absolutely love ittt!~ ^ o ^ The whole design came out so nice & perfect (especially my ring finger which I'm most proud of). The finishing touch was very nice and smooth. The other fingers were also really nice except that the black kind of got smudged when I put on the MAY, since it wasn't fully dry, but nonetheless, one of my favorite designs.
(2) For this week's nails

Base: Essie Turquoise & Caicos with white polka dots and topped with Essie Matte About You. - A beautiful color but formula was very thin. This was 3 coats but still came out nice. Not troublesome to apply. I may have overdone the polka dots a bit as I went along, lol! But it's okay - I adore this plain set. The MAY flattened the set but made it very cute. I received a compliment on them hehe ^ o ^ first one since I've started college in August - sad, I know.
-♥-
From the last post - I've only done different sets on the Misa polishes I have - here's a preview / final look & I'll be posting up tutorials on how to do them as soon as I have the posts typed and ready to go. Also there will be more tutorials in the future since I recently restocked on plastic tips to present my tutorials on. :D♥
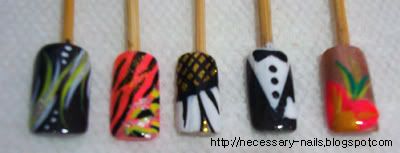
For my second tutorial, I will present the steps {through pictures} of how I made the first design of the 5 nails in the picture above.
need:
~ Essie Ridge Filler {base coat}
~ Misa Wishing on a Star
~ Color Club NA54 Neon Yellow {nail art}
~ Kiss Nail Art White
~ Kiss Nail Art Silver Glitter
~ Seche Vite Quick Dry Top Coat

prep, base coat and two coats of WOAS.


